
With the recent addition of custom event tracking, you can get really creative in what you can achieve with Pirsch. In this article, I would like to present two use-cases we have implemented. The first one uses our JavaScript snippet to track the reading time of blog articles, the second one reliably tracks registrations.
Tracking the Reading Time of Blog Articles
Events are really useful as you can programmatically control when they are sent. Like on a button click, a form submission, after a successful checkout, … or to sent an event once a visitor has read a blog article. For our blog, we set the following goals:
- see how many visitors actually read an article (not just scrolled through or read it partly)
- track the average reading time
- track articles individually from a single event
Before I will go into the implementation details, we have to define when an article is fully read. We don’t just want to see how often an article has been clicked on, but actually if the visitor read it. Seeing how often it has been visited can be achieved without events. So, when does it count as fully read? An article is fully read if the visitor spent enough time on the page to be able to read through it, and when he reached the end of the article. The required time to read can be calculated from the word count (usually about 200 words per minute) and the scroll position can be used to determine if the visitor has seen everything.
Step 1: Add the Javascript Snippet
Before you can send events, you have to add the following snippet to the head section of your page. In our case, we added the snippet to the Hugo HTML template (Hugo is a static site generator).
<script type="text/javascript" src="https://api.pirsch.io/pirsch-events.js"
    id="pirscheventsjs"
    data-code="{{.Site.Params.pirsch}}"></script>
The {{.Site.Params.pirsch}} variable is replaced with the identification code you can find on the settings page on the dashboard.
Step 2: Add a custom script to the end of each article
Again, we added a JS script to our page. This time as part of the single.html template, which is used to generate the page for an article.
{{- $article := resources.Get "js/article.js" -}}
<script type="text/javascript" src="{{$article.RelPermalink}}"
    id="article"
    data-title="{{.Title}}"
    data-words="{{countwords .Content}}"></script>
The script is called article.js. The Hugo template generates a relative permalink to it. One advantage of using a static site generator is, that we can calculate the number of words ({{countwords .Content}}) and get access to the title ({{.Title}}) without having to extract it from the HTML.
Step 3: Writing the Script
After we set everything up, let’s write the actual code! Calculating the scroll position is a bit tricky, so I’ll use this function I found on Stack Overflow.
function getScrollPercent() {
    const h = document.documentElement,
          b = document.body,
          st = 'scrollTop',
          sh = 'scrollHeight';
    return Math.floor((h[st]||b[st]) / ((h[sh]||b[sh]) - h.clientHeight) * 100);
}
It simply returns the scroll position relative to the full page length. 0% means you haven’t scrolled at all, 50% is halfway through, 100% and you have reached the bottom of the page.
To initialize our script, let’s add an event handler when the page is fully loaded and grab the article title.
// DOMContentLoaded is executed once the page is fully loaded
window.addEventListener("DOMContentLoaded", () => {
    // Grab the script tag itself using the ID we set earlier so that we can access the data-... attributes
    const script = document.getElementById("article");

    // Just a quick check everything is filled
    if(script &&
        script.hasAttribute("data-words") &&
        script.hasAttribute("data-title")) {
        // This will returns the article title
        const title = script.getAttribute("data-title");
Now that we have that out of the way, we can calculate the minimum required reading time before we sent the event and check that the visitor has scrolled to the bottom of the page.
// Calculate the minimum required reading time in seconds
const minReadingTimeSeconds = Math.floor(parseInt(script.getAttribute("data-words"))/220)*60;

// Save the current time so we can calculate the reading time later on
const start = new Date().getTime();

// We only want to send the event once
let done = false;

// Every time the visitor scrolls, check if we need to send the event
window.addEventListener("scroll", () => {
    // Here we use the scroll position function to check if the visitor has scrolled down the page.
    // 85% is not quite the end of the page because you don't have to scroll all the way down to fully read through.
    // How high you set this value depends on your page layout.
    if(!done && getScrollPercent() > 85) {
And finally, check that the minimum required reading time is reached and sent the event.
let readSeconds = Math.floor((new Date().getTime()-start)/1000);

if(readSeconds >= minReadingTimeSeconds) {
    done = true;
    pirsch("Read article", {
        duration: readSeconds,
        meta: {
            title
        }
    });
}
Calculating the reading time is straightforward. Simply subtract the start time from the current time and get the full seconds. The event is called Read article, with the reading time for the duration and the title in the metadata. The duration is used on the dashboard to calculate an average.
As a bonus, we add a maximum reading time and save the title in the local store. The maximum makes sure visitors who leave tabs open don’t artificially increase the reading time and the local store is used to make sure the event is only sent once, even after a page reload. Add the following right before you sent the event.
localStorage.setItem(title, "read"); // Set the title to "read"

if(readSeconds > minReadingTimeSeconds * 2) {
    readSeconds = minReadingTimeSeconds * 2; // Limit the reading time to twice the minimum reading time we have calculated
}
Now before adding the scroll event handler, we can check that the title doesn’t exist in the local store.
if(!localStorage.getItem(title)) {
    // Calculate minimum reading time and so on...
You can find the full source code at the bottom of this article.
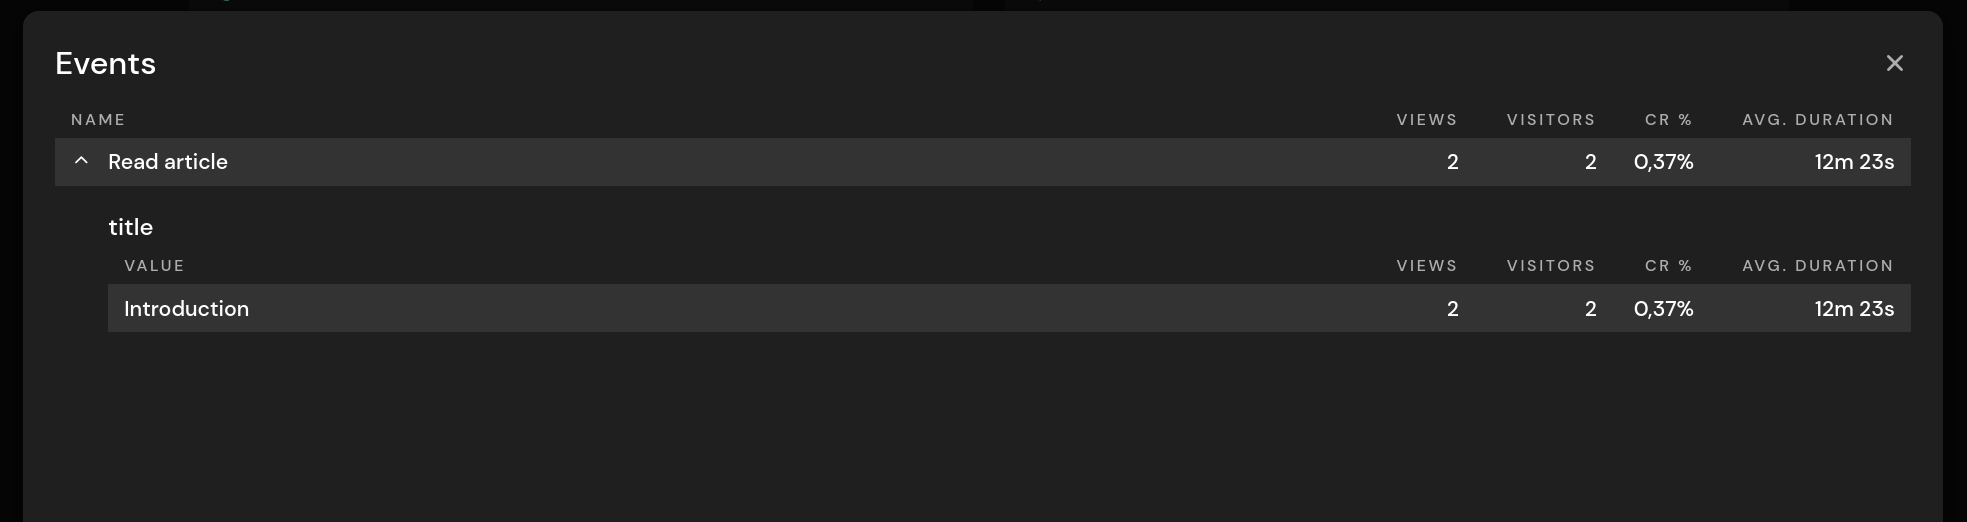
Step 4: Viewing the Results on the Dashboard
Once the first visitors have started reading articles, the event will automatically appear on the dashboard.
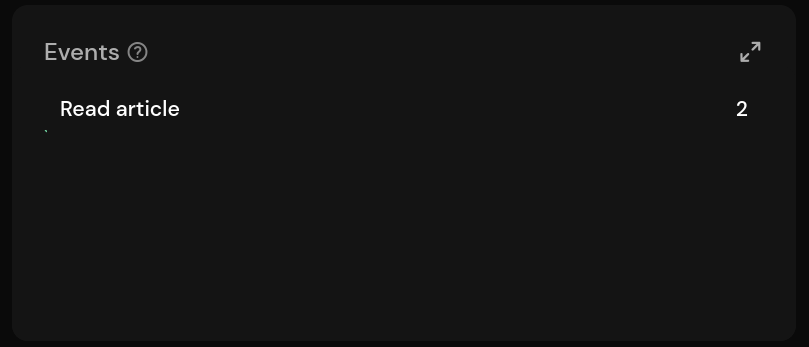
Open up the detailed view to see which articles were opened and how long it took visitors to read through them. The number of views and visitors will be identical, as we prevent the event from being sent twice.
Tracking Registrations Reliably
For our second example, I will create an event by calling the API using the Go SDK from the backend. We previously tracked registrations using a conversion goal. Each time someone visited /confirm on our website, we counted that as a new user. This is not reliable, as anyone can visit the page. The event fixes that, as we can send it only when a new account has been confirmed.
How you install one of our SDKs is described in our documentation. I’ll assume you have done that already.
For the account confirmation page, we have a handler function that looks like this on our backend (shortened).
func SignUp(w http.ResponseWriter, r *http.Request) {
    // Track the page view. The hit is also used for the conversion goal
    hit(r)

    // hCaptcha validation, create user account, ...

    if err != nil {
        // Show an error
    } else {
        // Registration successful!
        data.SignedUp = true

        // We sent the event asynchronously, the user shouldn't have to wait for this call to be finished
        go func() {
            // SDK call to send the event (no metadata or duration in this case)
            if err := client.Event("Registration", 0, nil, r); err != nil {
                // Log error
            }
        }()
    }

    // Render the page...
}
Simple, right? The number of registrations will now show up in the same panel as the reading time event from above.
Conclusion
As you can see, events enable you to track almost everything. Something you should keep in mind is that you have to make sure not to send any personal information that can be used to identify individual visitors. You can learn more about events from our documenation.
In case you have questions or trouble setting it up, feel free to contact us on Twitter @PirschAnalytics or by sending us an email.
Full JavaScript Source-Code
This is the full script, without the getScrollPercent function.
window.addEventListener("DOMContentLoaded", () => {
    const script = document.getElementById("article");

    if(script && script.hasAttribute("data-words") && script.hasAttribute("data-title")) {
        const title = script.getAttribute("data-title");

        if(!localStorage.getItem(title)) {
            const minReadingTimeSeconds = Math.floor(parseInt(script.getAttribute("data-words"))/220)*60;
            const start = new Date().getTime();
            let done = false;

            window.addEventListener("scroll", () => {
                if(!done && getScrollPercent() > 85) {
                    let readSeconds = Math.floor((new Date().getTime()-start)/1000);

                    if(readSeconds >= minReadingTimeSeconds) {
                        done = true;
                        localStorage.setItem(title, "read");

                        if(readSeconds > minReadingTimeSeconds * 2) {
                            readSeconds = minReadingTimeSeconds * 2;
                        }

                        pirsch("Read article", {
                            duration: readSeconds,
                            meta: {
                                title
                            }
                        });
                    }
                }
            });
        }
    }
});
Title image by Lukas Blazek

