
With the launch of version 2.0, we added white labeling to Pirsch and the ability to use custom domains for dashboards. In this article, I will explain how we use Caddy to automatically provision SSL certificates for them and how we configured it as our reverse proxy and load balancer.
The Caddy documentation is a good starting point if you’re trying to do something similar, but I felt like there wasn’t a good overview of how to put all the pieces together. This is my attempt to fill that gap.
I’m assuming in this article that you’re running Linux on your server.
What Is Caddy?
Before we get into the details, let’s take a quick look at what Caddy is. Caddy is an open-source server that bundles a static web server, reverse proxy, load balancer, and more into a single binary that can be easily deployed on any server. It’s available on GitHub and has many extensions you can install using the official plugin configurator.
It’s easy to configure and has an API to dynamically change the configuration at runtime. One of the most interesting features, and the reason we switched to it completely, is the ability to dynamically provision SSL Certificates for external domains.
Our Infrastructure Prior to 2.0
We used Caddy prior to version 2.0 in combination with Traefik. Traefik is also an enterprise grade reverse proxy and load balancer that we used internally for service discovery in conjunction with HashiCorp Consul. Our use of Caddy was very basic and we only used it to load balance requests.
Here is a simple overview of the setup:
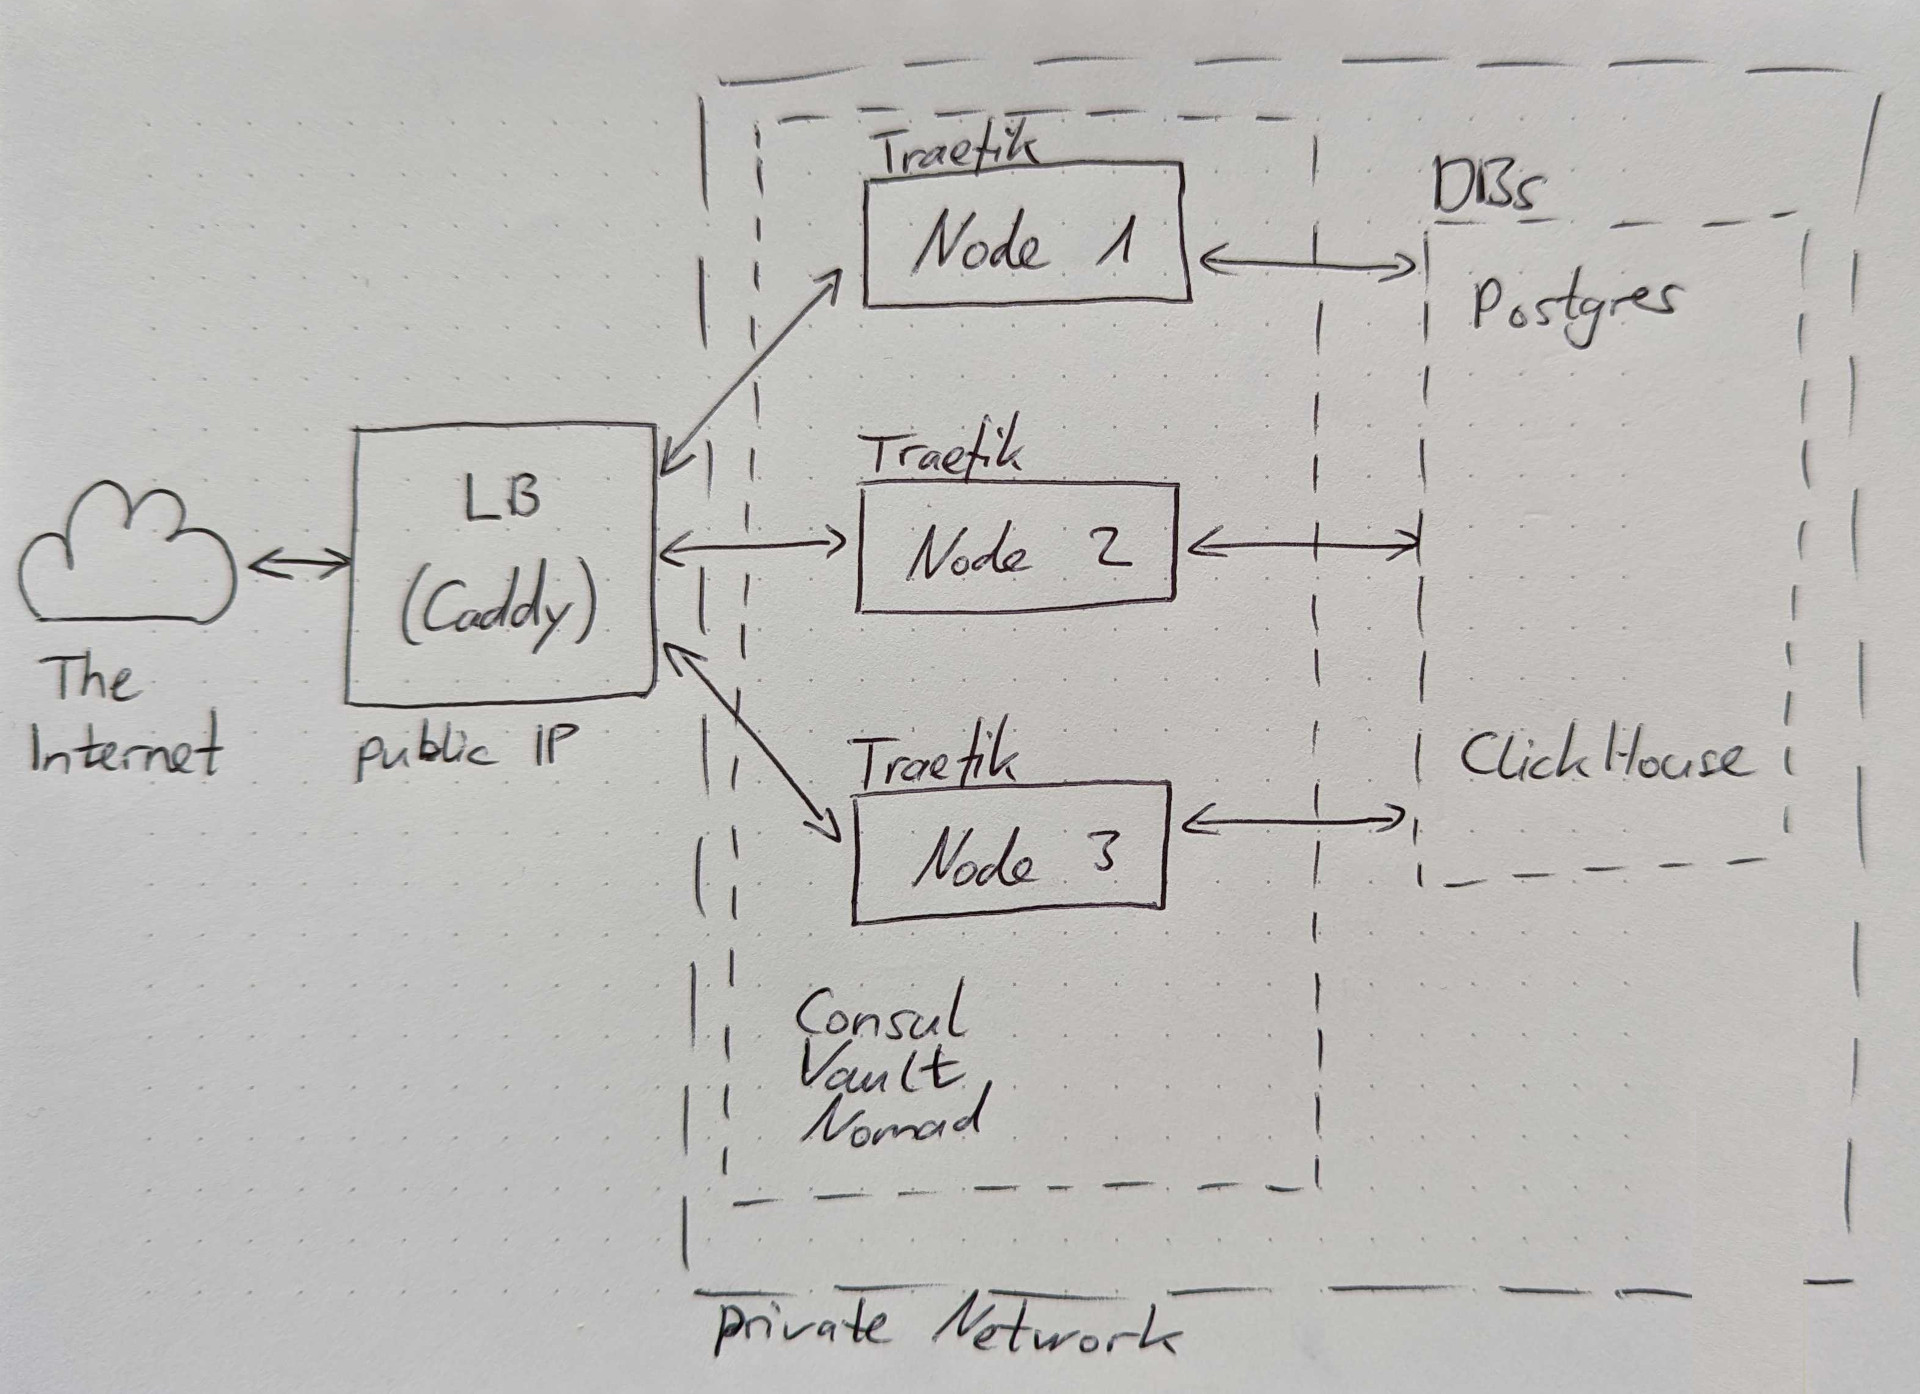
So Caddy was load balancing incoming requests to the cluster. Which resolved the IP and port through Traefik, which talked to Consul, which talked to Nomad to find a service. I don’t want to go into too much detail about each service here and what it is because we already did that in another article, but I think you can see why we wanted to reduce complexity.
New Infrastructure Layout and Goals for 2.0
Something had to change. Since we were working on full white labeling anyway, which required Caddy’s dynamic SSL certificate provisioning, why not clean up the mess?
To reduce complexity and network overhead, our goal for 2.0 was to remove Traefik from the server cluster and let Caddy handle everything. This would also allow us to eliminate the complicated Traefik configuration, making infrastructure changes less error-prone and time-consuming. Fortunately, HashiCorp also added simple service discovery and secret management directly into Nomad, eliminating the need to install Consul and Vault.
This meant we could potentially remove:
- Traefik as our internal reverse proxy
- Consul for service discovery and server meshing
- Vault for secrets management
Instead, the new configuration would look like this:
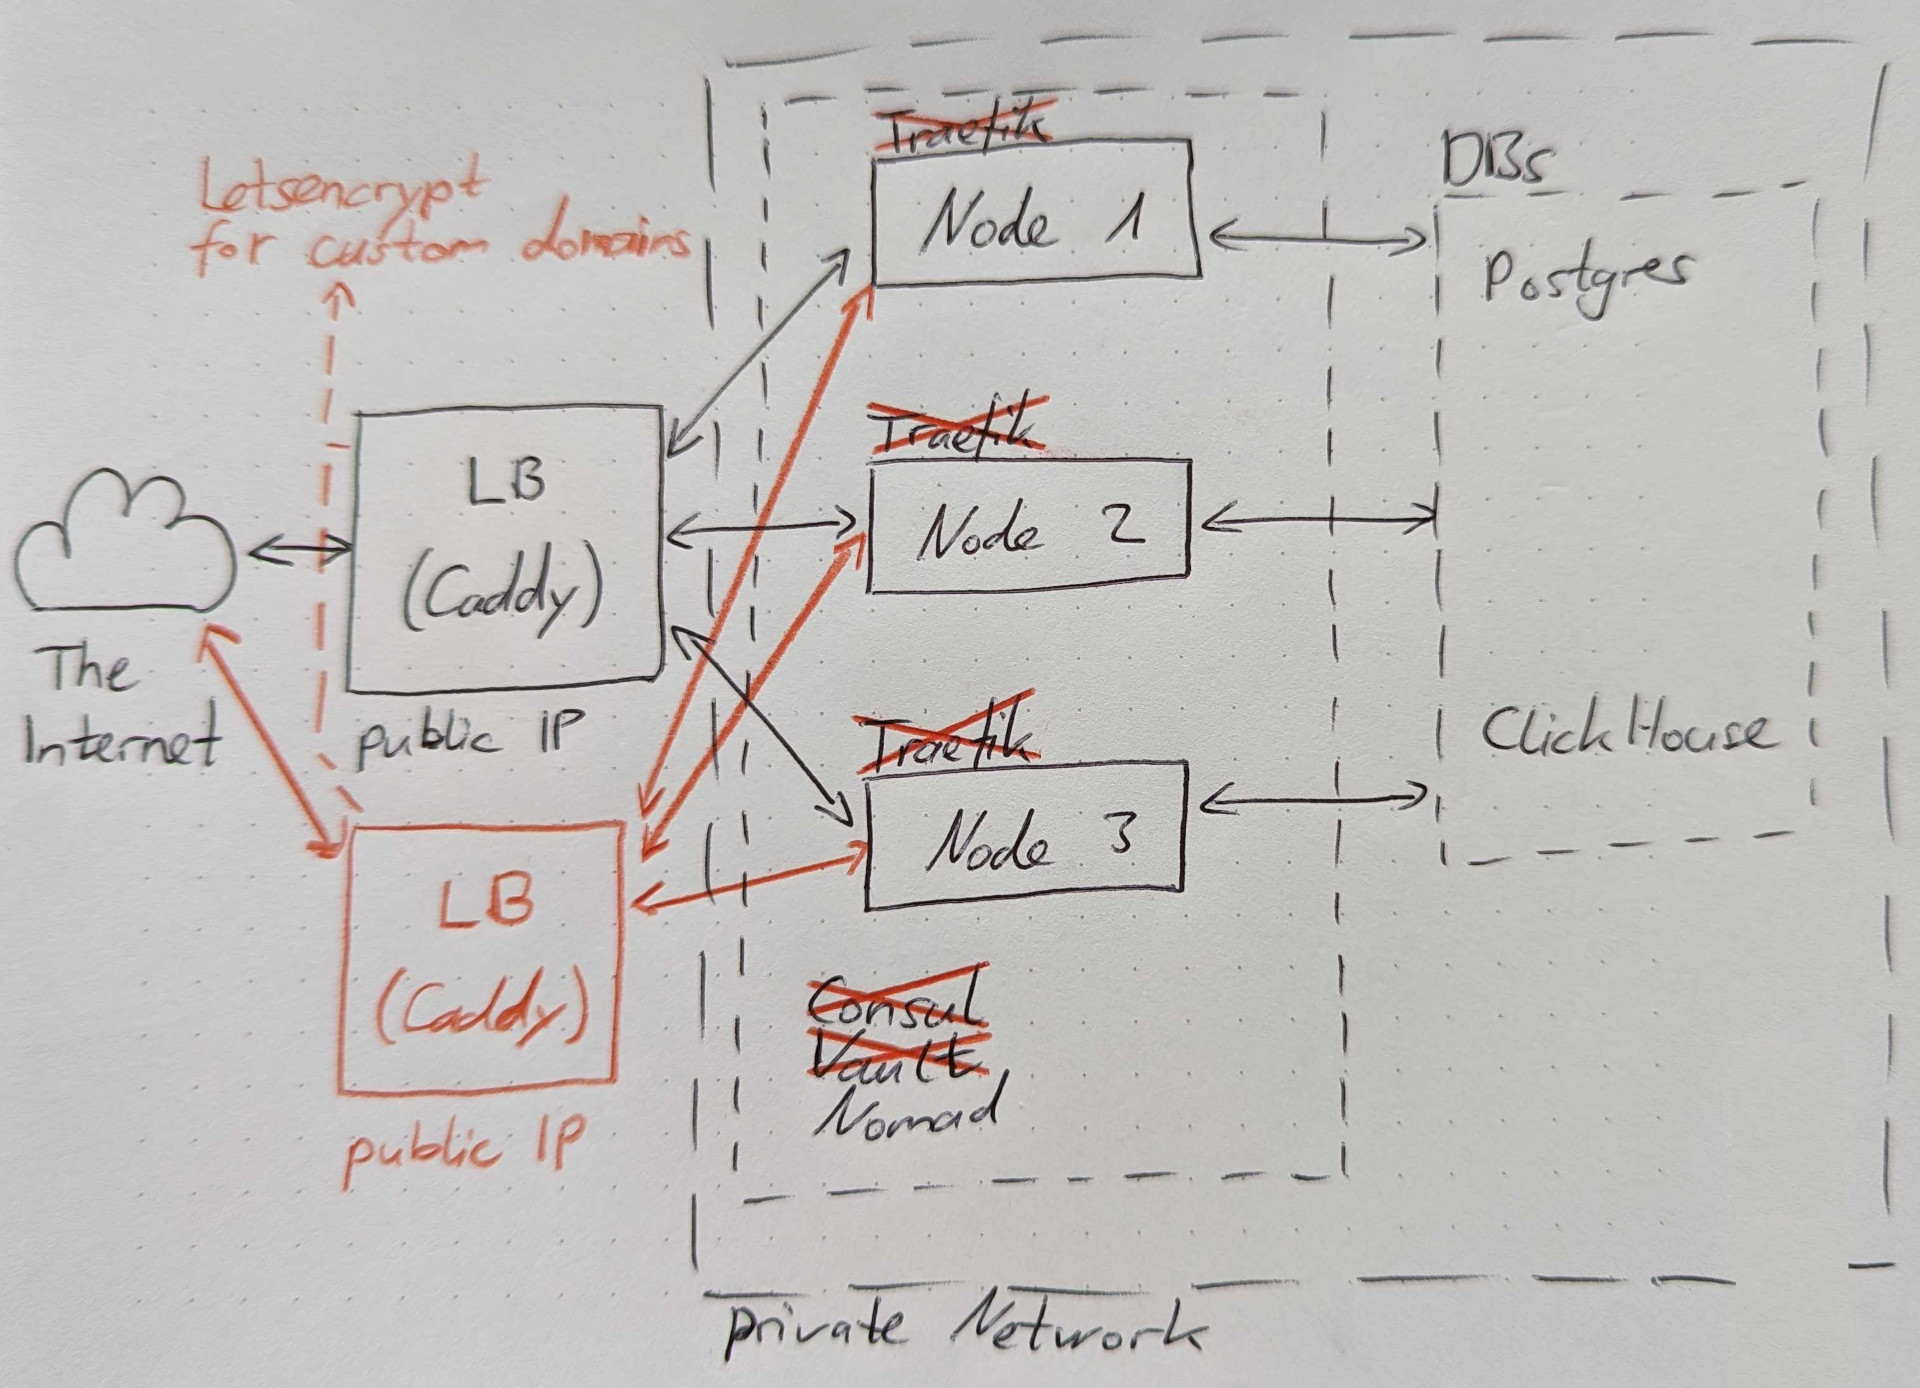
Of course, when you make a change like this, you should set up a new cluster and test all the changes. This is what we did and still do today to ensure that infrastructure changes can be safely pushed into production.
Installing Caddy
Installing Caddy is easy. As mentioned before, you can download a precompiled binary from their website that includes any plugin you might need. In our case, we added the Hetzner DNS plugin to allow Caddy to make changes to our DNS configuration. This is required so that Caddy can satisfy the Letsencrypt ACME DNS challenges and issue SSL certificates.
Download the binary and place it in /usr/bin/caddy on your server.
You can use any tool you like to manage the service. In our case (and probably yours), we set it up on systemd. The configuration file is available from the docs, but for completeness, here it is:
[Unit]
Description=Caddy
Documentation=https://caddyserver.com/docs/
After=network.target network-online.target
Requires=network-online.target

[Service]
Type=notify
User=caddy
Group=caddy
ExecStart=/usr/bin/caddy run --environ --config /etc/caddy/Caddyfile
ExecReload=/usr/bin/caddy reload --config /etc/caddy/Caddyfile --force
TimeoutStopSec=5s
LimitNOFILE=1048576
LimitNPROC=512
PrivateTmp=true
ProtectSystem=full
AmbientCapabilities=CAP_NET_BIND_SERVICE

[Install]
WantedBy=multi-user.target
As you can see, the service is started after networking is online and loads the Caddyfile from /etc/caddy/Caddyfile, which we will create in the next step.
Caddy Configuration
There are two ways to configure Caddy:
- using the API and JSON
- using a Caddyfile
The differences are described in their documentation, but in general the API is more feature complete and allows partial updates, while the Caddyfile is less flexible but easier to create by hand.
We chose the second option because we don’t need to change the configuration on the fly and a single Caddyfile is easier to handle.
Caddy has a special configuration format that is easy to read and quite intuitive, so it won’t take you long to learn. I will only show part of our configuration here, as it is quite long.
{
#	debug
    acme_ca https://acme-v02.api.letsencrypt.org/directory
    email <YOUR EMAIL ADDRESS>

    servers :443 {
        listener_wrappers {
            http_redirect
            tls
        }
    }

    servers {
        max_header_size 4kb

        timeouts {
            read_body 10s
            read_header 10s
            write 10s
            idle 1m
        }
    }

    on_demand_tls {
        ask http://<SERVICE IP AND PORT>/api/v1/domain/custom
        interval 1s
        burst 5
    }
}

www.pirsch.io {
    redir https://{labels.1}.{labels.0}{uri}
}

pirsch.io:443, *.pirsch.io:443 {
    @api {
        host api.pirsch.io
    }

    @dashboard {
        not {
            # ...
            host api.pirsch.io
            host pirsch.io
        }
        host *.pirsch.io
    }

    # More services like above...

    reverse_proxy @dashboard 10.0.1.2:8888 10.0.1.3:8888 10.0.1.4:8888 {
        health_uri /
        health_interval 5s
        health_timeout 3s
    }

    # More reverse proxies like above...

    request_body {
        max_size 2mb
    }

    tls {
        dns hetzner "<HETZNER SECRET>"
    }

    encode gzip
}

:443 {
    # Multiple rewrites and reverse proxies for the Pirsch JavaScript snippets

    rewrite /p.js /pirsch.js

    reverse_proxy /pirsch.js 10.0.1.2:9999 10.0.1.3:9999 10.0.1.4:9999 {
        health_uri /pirsch.js
        health_interval 5s
        health_timeout 3s
    }

    tls {
        on_demand
    }
}
Caddy uses {} blocks for configuration. Comments start with #.
The first block is a server-wide configuration that applies to all other blocks. In our case this is:
- the Letsencrypt URL to request certificates
- the Letsencrypt email address
- a
serversblock to ensure that we only serve traffic on encrypted connections. Allhttp://...requests will be redirected to HTTPS - another
serversblock (this time without a port) to set some connection limits, like read and write timeouts - and, most importantly for custom domains, an
on_demand_tlsblock to tell Caddy how to make sure it’s allowed to request a certificate for an external domain. More on this later
You can add the debug statement here (currently commented out) in case things don’t go according to plan and you need to find out what went wrong. Once enabled, Caddy will log requests and other useful information. We have it disabled by default for privacy reasons, but it was very useful when we were DDoSed earlier this year.
Next, you have a block that tells Caddy to redirect www.pirsch.io to just pirsch.io. Always make sure you’re hosting your site on a single domain. www.pirsch.io and pirsch.io are technically completely different domains. Having your website on two domains will count as duplicate content and will lower your ranking in search engines like Google.
The next block starting with pirsch.io:443, *.pirsch.io:443 is dedicated to our services and our own domain. Any request to pirsch.io or any of our subdomains will be handled by this block. So custom domains are not relevant yet, but we’ll get to that. Each block starting with @ can be considered a variable. In this case they define the services we are running and the domains they are on. For example, the API is on api.pirsch.io, so Caddy will resolve to that if it finds it in the hostname.
The dashboard is a bit different and includes a not block.
@dashboard {
    not {
        # ...
        host api.pirsch.io
        host pirsch.io
    }
    host *.pirsch.io
}
It filters out all other services to make sure you can access your dashboard on a custom subdomain, like my-domain.pirsch.io.
Finally, we need to tell Caddy where to find the services and load balance the requests between them. In our case we are using an internal network with three nodes. For example, for the dashboard, we set up a reverse proxy for @dashboard like this
reverse_proxy @dashboard 10.0.1.2:8888 10.0.1.3:8888 10.0.1.4:8888 {
    health_uri /
    health_interval 5s
    health_timeout 3s
}
The block includes a health check, so if one of the nodes goes down, Caddy will not forward any requests to it.
The other directives in this block (request_body, tls, encode) are mostly self-explanatory. request_body sets a maximum size for the request body. 2 MB is quite small, but sufficient for our use case. tls configures the Hetzner plugin. This is needed for Caddy to talk to the Hetzner DNS service. encode gzip enables gzip compression.
Okay, so far the configuration was pretty standard, except for the on_demand_tls block. The last block is where it is getting interesting.
:443 {
    rewrite /p.js /pirsch.js

    reverse_proxy /pirsch.js 10.0.1.2:9999 10.0.1.3:9999 10.0.1.4:9999 {
        health_uri /pirsch.js
        health_interval 5s
        health_timeout 3s
    }

    tls {
        on_demand
    }
}
As you can see, this will handle requests to any domain (no hostname specified) on port 443. Port 443 is used for SSL encrypted HTTP traffic. Depending on how your service works, adding the tls block may be enough to ensure that Caddy will provision SSL certificates for external domains.
In our case, we also added some rewrites for our scripts. As a Pirsch Plus customer, you can use your own domain to serve the JavaScript snippets. For example, https://your-domain.com/p.js is rewritten to https://your-domain.com/pirsch.js and served by the service on port 9999. We did this because pirsch.js is blocked by ad blockers, but filtering p.js would potentially break a lot of sites, so this is a way to get around ad blockers.
The main takeaways from the configuration are:
- the
on_demand_tlsblock - the
tlsblock for Hetzner - the
tlson_demandblock so that Caddy knows that it is supposed to request certificates
With the configuration complete, Caddy will now ask the on_demand_tls URL if it should request a certificate the first time a request is made for an unknown domain. If so, it will set up the DNS challenges using the Hetzner DNS API, request the certificate, and serve the request. The first time this happens for a new external domain, it may take a few seconds to respond, but after that, you will have automatic renewal of custom domain certificates.
Adding a Domain Verification Endpoint to the API
For security reasons, Caddy doesn’t just request certificates for any external domain that happens to point to it. Instead, it asks a custom API endpoint if it should request a certificate. We have defined this endpoint in the configuration in the on_demand_tls block as http://<SERVICE IP AND PORT>/api/v1/domain/custom.
Implementing the API endpoint is really easy. Caddy will send a GET request to your service with the external domain as the request parameter.
http://<SERVICE IP AND PORT>/api/v1/domain/custom?domain=external-domain.com
If you respond with a status code of 200 (the HTTP status code for OK), Caddy will request a certificate. Otherwise it will reject the request.
Starting Caddy
After you’ve set up the configuration and implemented the API verification endpoint, you’re ready to start Caddy. Using systemd, this can be done by running the following commands:
sudo systemd enable caddy.service
sudo systemd start caddy.service
To check if the service has started, run sudo systemd status caddy.service. If it failed to start, check the logs with sudo journalctl -u caddy.service. You can add -f to follow the logs.
Using a Custom Domain
That was all very technical, but what does it look like from a user perspective? Well, it’s really simple and completely automated!
On the settings page, there is an entry to set up a custom domain (for Pirsch Plus customers).
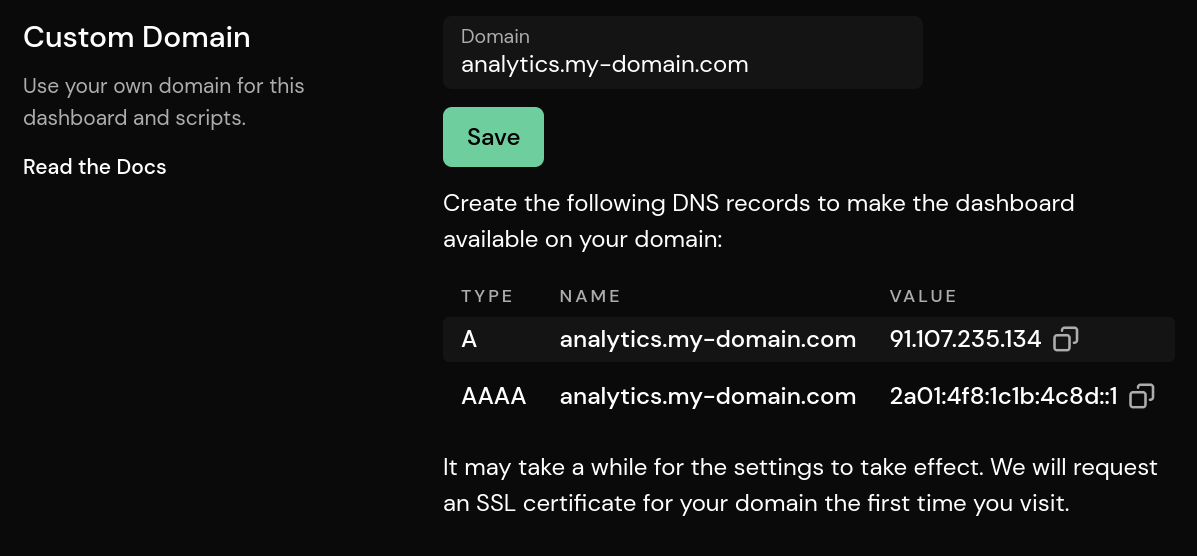
Once saved, it will show what the user needs to do to set up DNS records and point their domain to our service. In production this would be four entries as we have two load balancers running Caddy, but the screenshot was taken on our test environment.
And that’s really all they need to do. The domain is stored in the database and looked up through the verification API endpoint by Caddy, which then goes ahead and requests an SSL certificate for the user’s domain.
Conclusion
I hope this article gives you a nice overview of how the different parts of our service work together, so that you can replicate it for your own product.
If you want to see it in action, you can sign up for an account or check out this public dashboard of our company website. Pirsch Plus is available during the free trial period. In case you have any questions, feel free to reach out to our support.

